Showing posts with label Computer Hardware. Show all posts

Monday, May 16, 2011

Intel Reinvents 3-D Transistor

Intel Tri-Gate 3-D Transistor
Intel Corporation recently announced a significant breakthrough in the evolution of the transistor, the microscopic building block of modern electronics. For the first time since the invention of silicon transistors over 50 years ago, transistors using a three-dimensional structure will be put into high-volume manufacturing. Intel will introduce a revolutionary 3-D transistor design called Tri-Gate, first disclosed by Intel in 2002, into high-volume manufacturing at the 22-nanometer (nm) node in an Intel chip codenamed "Ivy Bridge." A nanometer is one-billionth of a meter.

The three-dimensional Tri-Gate transistors represent a fundamental departure from the two-dimensional planar transistor structure that has powered not only all computers, mobile phones and consumer electronics to-date, but also the electronic controls within cars, spacecraft, household appliances, medical devices and virtually thousands of other everyday devices for decades.

Scientists have long recognized the benefits of a 3-D structure for sustaining the pace of Moore’s Law as device dimensions become so small that physical laws become barriers to advancement. The key to today’s breakthrough is Intel’s ability to deploy its novel 3-D Tri-Gate transistor design into high-volume manufacturing, ushering in the next era of Moore’s Law and opening the door to a new generation of innovations across a broad spectrum of devices.

Wednesday, January 19, 2011

How To Fix Problems in PC crashes

Here are some useful tips on How to fix common problems in PC.How To Fix Problems in PC crashes
Your computer slows down, and part of the screen goes either black or white. This usually means that you’re using too many applications or programs all at once, and your computer can’t handle it. Try pressing ctrl+alt+delete, and look for the program that giving you trouble (usually labeled “not responding”), then try closing the said application by clicking end task. And if your computer is still in the line age of the dinosaur, try not to do all things at once. You might end up with less than you want to gain. Also, this may mean that your 20 years old version computer needs some upgrading like increase of RAM, or better yet, a new computer.

You removed some files or programs from your PC, and the next time you boot up, it won’t.
All computer operating systems (OS) have their own standard files and applications that will render the computer inoperable if you remove them. It safe to say that in windows, whatever was installed in your PC should not be removed, because windows will look for it when you boot up again. Also don’t simply delete programs that look unnecessary or uninstall them. When you boot up, windows system files look for programs that have been installed, so whether you remove the program manually or accidentally, you’re bound to get in trouble.

You installed a new hardware and software, and get a fatal exception error (or something like that). That’s what you called “Blue Screen of Death”. You might have installed something that is incompatible with your OS, it might be a new sound card, RAM, device driver, software. Try to remove that hardware that you installed or download the latest software updates for that particular hardware. Also pieces of advice, if you are unsure about installing something, try to find someone who knows better.

Why doesn’t my PC shut down, why is it so slow? When about to shut down your PC, allow a few minutes for some rest time. Illegal shutdowns can result in more permanent damage to your files or worst to your PC as well. The system might still be resolving something, maybe like cleaning up temporary files or folders, reallocating memory. This will help prevent from crashes. Try to backup your files on another media, like CD, DVD, or another hard disk. When your system fails, you can still restore your files.

Wednesday, December 29, 2010

Increase the Battery Life of your Laptop

One of the biggest advantages of using a laptop is the ability to save energy. Since that we always use our laptop it also drain more power because of its constant use. Because your laptop has a battery that can last over an hour you can carry wherever you wanted to. But how can you save energy if your laptop remains to your wall outlet because it cannot last longer than an hour? Here are several tips on how to increase the battery life of your Laptop.

1. Darken the screen: Your laptop screen is found to be the most power-hungry component in your laptop. Your laptop screen needs high amount of battery power to maintain its clear and luminous display. To preserve this power you can adjust it’s brightness to a low level. Just good enough to our eyes.
2. Modify the power settings: Windows Vista powered laptop comes with several outstanding power features. It can help you get the most proficient performance when your laptop is plugged and optimize its life when it’s on the move.
3. Turn off Wi-Fi: Wi-Fi (Wireless Fidelity) is among the greatest battery power eater. It weakens your laptop’s battery from perpetually absorbing power from the battery even if you’re not online. If you are using your laptop outside from the wireless network it is more advisable to just turn off your Wi-Fi to save some power. If your laptop doesn’t have a function button to switch on or off your wireless adapter you can just go to control panel, access the Network Connections and disable it from there.
4. Switch off peripheral devices: USB sticks, mouse and web cams are the primary offenders in sucking out your batteries life. Utilizing USB devices also contributes in draining your laptop’s power, disconnecting it when not in use, ejecting your devices as soon as possible and switching off your laptop’s inbuilt webcam can help conserve your laptop’s precious power.
5. Invest in some computer hardware: Usually laptops come with a six cell-battery, but a lot of makers today already provides eight or even 12-cell elective upgrades, which will definitely double your power. If you can afford it then why not invest more, in the long run you will be surprise on how much energy and money you save just by investing on the right piece.

Monday, December 20, 2010

ASUS GTX580 the most powerful DirectX 11

The successful Fermi series from NVIDIA continues to expand with the new GTX 580, featuring 512 CUDA cores and achieving the most impressive DirectX 11 performance ever fielded by a single NVIDIA GPU. ASUS has added its own exclusive Voltage Tweak to the GTX580 for significant output gains on demand. The hardcore performance of the ASUS GTX580 offers full HD NVIDIA 3D Vision Surround gaming and movie watching on up to three screens, and CUDA parallel computing that puts the great power of the GPU at the disposal of the CPU for overall system enhancement.

Product Highlights

• ASUS exclusive Voltage Tweak gives users a quick and accessible way to overvolt the graphics card to its limit at 1157MHz – up to 50% faster performance compared to reference.

• ASUS GTX580 is factory overclocked at 782MHz with 512 CUDA cores, the most of any current NVIDIA design. It features a large 1536MB GDDR5 video memory, rated at over 4GHz. The massive 384-bit memory interface opens up performance by removing data transmission bottlenecks for better hardware utilization.

• Support for NVIDIA 3D Vision Surround in full 1080p HD — users can expand 3D games, movies and photos on up to three screens at once for the most immersive PC multimedia experience around.
• With its over-the-top power, ASUS GTX580 opens up optimal utilization of DirectX® 11 features such as advanced tessellation and real time ray tracing. This enables high resolution PC gaming in unprecedented detail, allowing even the most taxing titles to run smoothly at maximum frames per second.

• HDMI 1.4a updates video output to the fastest, highest-bandwidth standard available. ASUS GTX580

Wednesday, October 14, 2009

Change the Screen Resolution of your Monitor

Change the Screen Resolution of your Monitor
The setting that determines the amount of information that appears on your screen, measured in pixels. Low resolution, such as 640 x 480, makes items on the screen appear large, although the screen area is small. You can switch your screen resolution temporarily to 640 X 480 if you have games or other programs that are set to run at that resolution. High resolution, such as 1024 x 768, makes the overall screen area large, although individual items appear small. Your monitor and video adapter determine how much you can change your screen resolution. You may not be able to increase the resolution above a certain level.


To change your screen resolution
1. Open Display in Control Panel.
2. On the Settings tab, under Screen resolution, drag the slider, and then click Apply.
3. When prompted to apply the settings, click OK. Your screen will turn black for a moment.
4. Once your screen resolution changes, you have 15 seconds to confirm the change. Click Yes to confirm the change; click No or do nothing to revert to your previous setting.

To change screen resolution in desktop
1. Right-click on desktop (Make sure you don’t hit the icons). Then click Properties.
2. On display property, click settings tab, under Screen resolution, drag the slider, and then click Apply.
3. When prompted to apply the settings, click OK. Your screen will turn black for a moment.
4. Once your screen resolution changes, you have 15 seconds to confirm the change. Click Yes to confirm the change; click No or do nothing to revert to your previous setting.

Friday, September 25, 2009

Philips LightFrame Monitor

Philips LightFrame Monitor
I was looking for the latest monitors in different computer shops to buy to replace my old CRT monitor. Computer Monitor is very important because it serves as the window of the computer. CRT monitors and TVs have each been optimized for the applications they've been traditionally used for. The former excel at displaying close-up high-resolution content, such as text, while lower-resolution TV screens' larger dot pitch and higher light output make them more suitable for rendering low-resolution photography such as film, intended for viewing at a distance. The problem is that neither of these techniques is appropriate on high-resolution PC monitors. PC users have had to live with TV-quality applications often appearing flat, dull and lifeless when displayed on a CRT monitor. The rise of high speed gaming, online games, video editing, DVD playback on the desktop and even video content on the Web means this deficiency has become increasingly unacceptable. Philips' answer to the problem came in the shape of their unique and innovative LightFrame technology, first revealed in late 2000. In essence, LightFrame seeks to simulate the output performance of a TV screen on a PC monitor. I got a glimpse of the Philips LightFrame LCD Monitor in one of the computer shop here in the city. It is said that its light blue glowing frame is soothing to the eyes. Reduce eye fatigue, brighten your mood, refresh your vision and improves concentration. The light hub relaxes the user less eye fatigue and imbues the user with the sense of well-being even after an extended period in front of the computer. LightFrame models can accept VGA and digital DVI signals and display hi-def signals having the capability of displaying Full HD 1920×1080p resolution. As for the price? It will go around Php5, 000 - Php9, 000 depending on the size of the LightFrame monitor.

Wednesday, July 08, 2009

Increasing the Battery Life of a Laptop

One of the biggest advantages of using a laptop is the ability to save energy. Because your laptop has a battery that can last over an hour you can carry wherever you wanted to. But how can you save energy if your laptop remains to your wall outlet because it cannot last longer than an hour? Here’s how to increase battery life.
  1. Darken the screen: Your laptop screen is found to be the most power-hungry component in your laptop. Your laptop screen needs high amount of battery power to maintain its clear and luminous display. To preserve this power you can adjust it’s brightness to a low level. Just good enough to our eyes.
  2. Modify the power settings: Windows Vista powered laptop comes with several outstanding power features. It can help you get the most proficient performance when your laptop is plugged and optimize its life when it’s on the move.
  3. Turn off Wi-Fi: Wi-Fi (Wireless Fidelity) is among the greatest battery power eater. It weakens your laptop’s battery from perpetually absorbing power from the battery even if you’re not online. If you are using your laptop outside from the wireless network it is more advisable to just turn off your Wi-Fi to save some power. If your laptop doesn’t have a function button to switch on or off your wireless adapter you can just go to control panel, access the Network Connections and disable it from there.
  4. Switch off removable devices: USB sticks, mouse and webcams are the primary offenders in sucking out your batteries life. Utilizing USB devices also contributes in draining your laptop’s power, disconnecting it when not in use, ejecting your devices as soon as possible and switching off your laptop’s inbuilt webcam can help conserve your laptop’s precious power.
  5. Invest in new brand of battery: Usually laptops come with a six cell-battery, but a lot of makers today already provides eight or even 12-cell elective upgrades, which will definitely double your power. If you can afford it then why not invest more, in the long run you will be surprise on how much energy and money you save just by investing on the right piece.
  6. Disable features: Windows Vista has got new features, but most of them prove to be needless by an ordinary user or even to some expert users. One good example is the Windows Aero, switching it off not only it will help you save a small amount of power but it will also make your laptop more proficient.

Thursday, June 25, 2009

Computer Memory

Expanded Memory, in computer science, on IBM PCs and compatible computers, a type of physical memory, up to 8 megabytes (MB), that can be added to machines based on the Intel 8086/8088 microprocessor or to machines with 80286/80386/80486 microprocessors running MS-DOS in real (8086-emulation) mode. The use of expanded memory is defined by the Expanded Memory Specification (EMS). Because it represents memory that is not normally accessible to programs running under MS-DOS, expanded memory requires an interface called the Expanded Memory Manager (EMM), which maps pages (blocks) of bytes from expanded memory onto reserved areas called “page frames” in an accessible memory area. Only EMS-compatible software can make use of expanded memory.

Extended Memory, in computer science, system memory beyond 1 megabyte (MB) in computers based on the Intel 80286/386/486 microprocessors. This memory is accessible only when the processor is operating in protected mode or in virtual real mode on the 386/486. Extended memory is not typically available to MS-DOS programs. However, it is available to OS/2 programs and can be made available to MS-DOS programs by the use of software that temporarily places the processor into protected mode or by the use of 386/486 features to remap portions of extended memory into conventional memory based on the EMS conventions.

Monday, June 15, 2009

How to choose a Motherboard

Motherboards (alternatively, Mainboards, mobo, or planar boards) are the backbone of any computer system. Without a working or properly installed motherboard, the computer is just an inert junk of plastic. The latest motherboard technology right now is called PCIe or PCI Express. In PCIe, the shared bus is replaced with a shared switch. Each device in the system will have exclusive access to the switch, and the switch will be able to create point-to-point exclusive communications between devices.

When choosing a motherboard, it is important to carefully consider the following concepts.
Non-Integrated System Board – each major component are installed in computer as an expansion card, like video card, sound card, LAN card, etc.
Integrated System Board – most of the component that would otherwise be installed as expansion card are integrated into the motherboard circuitry and were designed for simplicity.

Selection of motherboards
Consider the following when selecting a new or replacing a motherboard:
  1. The footprint, or size requirements, form factor of the computer case. Such as ATX (Advanced Technology Extended), Micro ATX, NLX (New Low Profile Extended), and BTX (Balanced Technology Extended).
  2. Compatibility with other devices such as CPU/processor, power supply, memory modules, and storage devices.
  3. Compatibility or type of BIOS (Binary Input Output System).
  4. Memory needs of the system. The type of memory, is it DDR2 or DDR3? How much memory can the motherboard handle? How many modules can the motherboard physically hold?
  5. Number of expansion slots. How many regular PCI (Peripheral Component Interconnect)? How many PCIe? Availability of an AGP (Accelerated graphics Port) if there is?
  6. Number and types of ports. How many USB (Universal Serial Bus) ports at the back of the motherboard? Are there USB slots integrate on the motherboard? Availability of a Firewire, serial port, parallel port, and keyboard and mouse port?
  7. What integrated peripherals are included on the motherboard? Such as Network card (LAN card), video card, or sound card.
  8. Disk controllers. IDE (Integrated Device Electronics), RAID (Redundant Array of Independent Discs), or SATA (Serial Advanced Technology Attachment).
  9. Are there drivers available for all the on-board components that match the operating system you want to use?
  10. Is the motherboard going to be used in a media center PC? If so, are the television/cable connections available?

Friday, June 12, 2009

How to add memory to a Laptop Computer

This article walks you through adding memory to your laptop computer. Adding memory to your laptop is a very simple process and it takes about 10-15 minutes. See also How to choose the right memory for your system.

First steps:
Discharge your self to avoid any electro static charges in your body. Locate the memory cover located on the bottom of the laptop. The first thing we need to do is turn off your laptop. Once it is completely off you will need to locate the cover for the memory compartment on the bottom of your laptop. The memory cover will be a square area with one or more screws to attach a cover to the bottom of your laptop. There are usually several compartments located on the bottom of laptop computers, some labeled and some not. Generally the cover for memory is square and 3 or 4 inches long/wide.

Second steps:
Once you have located the cover of the laptop memory you will need to remove it by using a small Phillips screwdriver. After the screws are removed the cover generally pops off or swings upward depending on the model of laptop. Once you have removed the cover you will see one or more memory chips. Laptops generally have two slots for memory chips.

Third steps:
Memory retaining lever now that we have located the laptop memory and removed the cover it is time to add the memory. If both memory slots are full you may need to remove one or both memory chips to put in your new memory depending on how much memory you purchased and the size. To remove the memory from the computer you will need to locate the release levers generally located on each side of memory. You will need to gently pull the lever away from the side of the memory to release it. Once the levers are release you will be able to gently pull the memory out of the socket.

Fourth Steps:
Now that we have removed the memory we can now add the new memory to your laptop computer. To do this you will want to slide the new memory into the socket where the old memory was removed or the socket that was empty. You will need to be careful during this process as the memory only fits one way. Never force the memory into the slot. Once you have the memory in the socket you will need to gently press down toward the bottom of the laptop in order to secure the holding levers around the sides of the new memory. Now attach the memory compartment cover and start your computer.

Monday, June 01, 2009

What are the different parts of the Keyboard

The keyboard is the common data entry device in a computer system. It is also called the Standard Input Device. You should also note that it is the slowest of all the input devices to use. It works with the very low current to send electrical impulses to the CPU when you press a key. Because the low current there is very little risk of electric shock from a keyboard and safety precautions are not necessary when using one.

A typical keyboard is divided into 5 regions:

  1. The Qwerty keyboard – This is the part of the keyboard that is used the most and gets its name from the first six letters of the top rows of the keys i.e. “Q, W, E, R, T, Y”. Note that this is only the case in the UK – other countries such as France have different key combinations reflecting their different use of letters. The layout of the keys was originally devised to actually slow typist down as the early typewriters were prone to getting jammed if the keys were hit too quickly. The average speed of a trained typist on a qwerty keyboard. Such as the shown above is up to six character per second.
  2. The Function keys – this part of the keyboard is situated above the qwerty keyboard. These keys are given the symbols F1 to F12 and are really shortcut keys to operate actions in programs or in the computer’s memory system. For example, pressing the F4 key might be a shortcut to saving a document to disk in a common word processing package.
  3. Editing keys – this part of the keyboard is situated to the right of the qwerty keyboard and is used to edit text or data in common programs. The edit keys are also used to move around the document (Page up or Page down) or go to the start (by depressing the Home key) or end (by depressing the end key).
  4. The Cursor Control Keys – These keys represent a quick way to move the cursor (in. for example, a word processing program) and are often quicker to use than the mouse. They are not recommended for moving the cursor over large distances. Here the home, end or page up and page down keys should be used.
  5. The Numeric Keyboard – this part of the keyboard is used mainly by the people in the financial services to enter large amounts of numerical data. The keys are duplicates of those above the Qwerty keyboard but are the positioned on the extreme right of the keyboard for ease of use with one hand.

Monday, May 25, 2009

The Mother of All PCs

Electronic Numerical Integrator And Computer (ENIAC)
Trace the lineage of that PC portable on your lap, and you’ll find the Electronic Numerical Integrator And Computer (ENIAC) at the base of the family tree. ENIAC was the first large-scale, general purpose, and a digital computer. ENIAC was initially built for the United States military to calculate the paths of artillery shells. It was later used to make calculations for nuclear weapons research, weather prediction, and wind tunnel design. ENIAC began operating in February 1946 and was used until October 1955. ENIAC was built by American physicist John W. Mauchly and American electrical engineer John Presper Eckert, Jr., at the Moore School of Electrical Engineering, University of Pennsylvania. Unlike modern computers, which use microprocessors composed of thousands or millions of transistors, ENIAC used vacuum tubes to process data. It had about 18,000 vacuum tubes, each the size of a small light bulb, 70,000 resistors, and 6000 switches. The computer was composed of 30 separate units with additional power supplies and cooling units. It weighed more than 30 tons, occupied 1800 sq ft and consumed 175 kw of power. ENIAC contained 20 special storage registers called accumulators that stored intermediate and final calculations. Each accumulator held a ten-digit number. ENIAC used decimal arithmetic in its operations rather than the binary arithmetic common in today’s computers. ENIAC could perform about 5000 calculations per second—more than 10,000 times slower than modern personal computers. And it was probably the first computer to use the conditional IF-THEN statement. A straight line runs from ENIAC to UNIVAC of 1951 (one of the first commercial computers), to the IBM PC, to Palm Pilot in your pocket. The ENIAC is the mother of all PCs.

Sunday, April 05, 2009

How to Choose the Right Memory for Your System

Adding RAM to your PC usually delivers the most speed for your system, but only if you buy the right kind of memory module for your PC. There are more types of PC RAM. Do you want SDRAM, PC100, nonparity, or unbuffered DIMM? Why not enjoy a refreshing DDR SDRAM, PC2700, CL2.5, or registered DIMM? Here are the ins and outs of PC memory. Begin by checking your system's user manual to identify the types of RAM your PC's motherboard supports. If you don't have the manual, visit the manufacturer's Web site and search for downloadable manuals or other tools that might help you find the information you need for identifying the right RAM for your PC. Enter the make and model of your PC or motherboard to generate a list of compatible RAM types.

Before you buy consider the following:
Maximum module size: Find out the maximum size of memory module that your PC supports. Don't buy a module larger than what your motherboard's memory slots can each accommodate.
RAM and connector types: Determine which of the four types of RAM your system uses: DRAM (EDO or FPM), SDRAM, DDR SDRAM, or RDRAM. All four types are mounted on one of three module types: SIMM, DIMM, or RIMM.
Most machines support only one type of RAM and have one type of module or connector, so mixing types isn't an option. The few motherboards that do accept two types of RAM allow only a single type to be used at any one time.
Memory speed: SDRAM, DDR SDRAM, and RDRAM are rated to match or exceed the PC's frontside bus speed (FSB), which is the speed at which data moves between the CPU and RAM. If your system comes with PC66 SDRAM, you can use PC100 SDRAM to replace it and get the faster speed, as long as your PC's frontside bus supports the higher rate. But if you mix RAM of different speeds, all RAM will operate at the speed of the slowest chip.
Memory banks: On some PCs, the memory slot closest to the CPU--usually called bank 0--must be filled before the motherboard's other memory slots. On other systems, bank 0 must have the largest RAM module (if you are using modules of different sizes). There's no fixed rule, so check your PC's documentation.
Column address strobe: The lower the CAS rating--or the CL rating--is, the better. SDRAM comes in CL2 or CL3 types, and DDR SDRAM comes in CL2 or CL2.5. Unless your motherboard requires a specific CAS or CL rating, get the lower (faster) rated module. Cost differences should be negligible. Again, if you mix modules of different speeds, they'll all operate at the slowest module's speed.

Thursday, March 26, 2009

How to add RAM for a faster PC

First, what is RAM? RAM is called as Random Access Memory. Speeding up your computer's memory remains one of the most popular upgrade to do. It's inexpensive, it's relatively easy, and it can dramatically improve performance of your PC. And today's memory-hungry software can make upgrading your PC's RAM a virtual necessity. For example, Microsoft XP recommends at least 128MB of memory; 256MB is better, however, and 512MB is better still. Now here a step by step procedure on how to add RAM for your system.
  1. Place your computer's power switch in the off position and disconnect the AC power cord.
  2. Follow the instructions in your owner's manual that describe how to locate your computer's memory expansion sockets.
  3. Before touching any electronic components or opening the package containing your new module(s), discharge yourself first by touching an unpainted, grounded metal object to discharge any electrostatic electricity you may have stored on your body or clothing.
  4. Handle your new module(s) with care; do not flex or bend the module(s). Always grasp the module by its edges.
  5. The module and the expansion socket are keyed. A small plastic bridge in the socket must align with the curved notch in the module. The bridge ensures the module can only be plugged into the socket one way.
  6. Insert the module into the socket at a slight angle. Make sure the module is completely seated in the socket. If you're having problems inserting the module into the socket, stop and examine both the module and the socket; make sure the notch in the module is properly aligned with the keyed plastic bridge in the socket. Do not force the module into the socket. If too much force is used, both the socket and module could be damaged.
  7. Once you are satisfied the module is seated properly in the socket, rotate the module upward until the clips at each end of the expansion socket click into place.

  8. After all modules have been installed, reinstall any other cables that may have been disconnected during the installation process. close the computer, plug in the AC power cord, and turn on the computer to see if the new memory has been installed correctly or if you see a memory check during POST (Power On Self Test) in the BIOS.

By: Techlabcapiz and Hectic Capiznon BLoggers 2009

Tuesday, March 17, 2009

How to know a drive is about to fail

As reliable as hard drives have become, they still have a finite lifespan. While regular backups and RAID technology can help you prevent data loss when a hard disk drive fails, it's better to catch the problem early and replace the hard disk drive on your schedule, rather than when it decides to fail.
Ironically, improvements in hard drive technology have caused some of the symptoms of impending failure to disappear. For instance, hard disk drive and controller designs now can hide the intermittent read/write failures that once foretold a hard disk drive going bad. Likewise, today's hard disk drives are virtually silent, which eliminates the changes in sound that used to alert IT personnel that a drive was going. Bearing failures, which used to be one of the most common causes of drive failure, are much less common today.


However, hard disk drives can still give off signs that they are about to fail. Including:
1. Disk takes a long time to come up. A hard disk drive that takes a long time to boot up is working hard. Maybe it's working hard because a lot of stuff needs to be initialized. But it could also be trying to compensate for intermittent read/write failures.
2. CHKDSK shows bad sectors. Bad sectors used to be a fact of life. Not any more. These days, any bad sectors showing up with chkdsk or similar disk test utilities usually mean the disk is going away. This is doubly true if the number of bad sectors is increasing, even very slowly.
3. Running hot. All drives get warm, but if the hard disk drive itself is running unusually hot compared to others in the enclosure, it is probably nearly the end of its useful life.
4. Consider the drive's history. A hard disk drive that has been dropped onto a hard surface (running or not) or else has overheated should be regarded with suspicion. It's a good candidate for failure. Overheating usually occurs when an enclosure's main fan or fans fail, allowing temperature to build up. If the system gets hot enough that you start getting read-write errors before the problem is spotted and fixed, there's a good chance the lifespan of the drives has been drastically shortened.
5. Drive LEDs that never go off. There's no relationship between overt computer activity and hard disk drive activity, as indicated by the drive LED. But if the LED used to come on intermittently and now glows constantly, something is very wrong and is probably going to get worse.
6. Disk cannot locate file table. If the disk can't find the Windows Master File Table (MFT), especially after an unexplained crash, the disk is almost certainly dying.

Wednesday, March 04, 2009

How to know your motherboard are dying

How will you now that your motherboard is dying? This has happened to me twice now. First time it was the BIOS chip that had failed on me. The board refused to get past the "verifying dmi pool data" message. New board on that one. Second time around it was the CPU overheating. If you don't mind playing with the hardware and you have some sort of speaker on the motherboard then try the following suggestions: Remove ALL of the pci cards, the ram modules and the mouse (yes, the mouse as well) and bare-boot the board. (If you are using a separate graphics card then unplug that too for the moment). If you have a speaker connected to the board then when you try and boot you will hear a long series of continuous beeps (See PC Boot Problems), which means that the board is trying to tell you that you have no ram installed. This is good because it means that the board's BIOS chip and the CPU are working just fine at this point.If you hear nothing then it's time to either try another CPU or to change the board. Game over...If you get past this point then switch off and plug the ram back in, and then try a re-boot. If you have more than one module then switch off and try each one separately before booting. If the problem is the ram then this will soon show up. If you get to this point then you should hear a different set of beeps (usually one long and three short). This means the board is looking for a graphics card.Now switch off, plug in the graphics card (if it is off-board) and try booting again. If you get a hang-up this time then you have a graphics card problem. If all is ok at this point then you can turn off the pc, replace each pci card one-by-one and try booting every time you plug one in. If the problem is with one of the cards then this will soon show up. I suspect you may fall over at one of the first two options, which means either board or CPU.

Note: not everyone knows how to tweak and configure a PC. So if you’re one of them, don’t try to experiment because it will do more damage to your system or other components. But if you got lucky, then that’s good. If you’re not sure of what you are doing on how to troubleshoot your own PC try to look for a Computer Technician because he/she knows what to do.

By:TechlabCapiz

Tuesday, February 24, 2009

How to Choose a Sound Card

If you want to add a sound card to your computer, or upgrade the sound card that it already has, you have several options
1. An MP3 card: If you’re an MP3 wizard with a hard drive’s worth of MP3 digital audio files, you’ll appreciate one of these specialized audio cards. An MP3 card contains a hardware encoder/decoder, which speeds up your PC’s ripping (the process of creating MP3 digital audio files from existing audio CDs) and MP3-playing performance.
2. A 24-bit card: For the absolute best in audio reproduction, go for 24-bit audio (that’s 192 KHz, for you audio heads), which is far superior to the sound produced by virtually all audio CD players. These cards can also support DVD audio, feature front-panel controls that fit in an open drive bay, and carry a built-in FireWire port — which is just the whipped cream and cherry on the sundae.
3. A surround sound card: These cards are specifically designed for 3D environmental audio within games and for full Dolby surround sound support when you watch DVD movies on your PC. Naturally, you need more than two mundane speakers from a discount store to enjoy the full effect — which is why a premium set of speakers is usually included with these cards.

Saturday, February 14, 2009

How to Install a new Video Card

Installing a video card is a little bit easy. Just follow these instructions on how to install a new video card. If you’re really not sure if you can do it then you have to look for someone (like a Computer Technician) who knew how to install a video card. The first thing you should consider is choose something that fits your needs. As with the other components it is important to get something that fits your needs. So you need to decide up front what you want from your final computer. Is it a media PC, an office type PC, something as cheap as possible or a high spec gaming PC? Whichever of these it is, will mean different aspects will be more important to you, but generally the faster the better. Determine the slots of you’re video card on your motherboard. Is it PCIe? AGP? PCI? Or ISA (for old model of mainboards). Now here are some instructions on how to install a new video card.

Shut down the computer. Disconnect all peripherals from the computer. Remove the cover of the chassis. Discharge your self first by putting your both hands on the chasses. Otherwise, put on a grounding strap if you have one and follow its instructions. Remove the computer's back panel if necessary. Knock out or unscrew the metal plate on slot holder on the computer's back panel. Remove old video card gently. If your video card is an AGP (Accelerated Graphics Port) insert the video card gently but firmly into an AGP slot. Or, if you’re using a PCIe (Peripheral Component Interconnect Express) video card insert the video card gently but firmly into an available PCIe slot. Don't touch any connectors on the card. Rock it into position if necessary, but don't force it. Screw the video card into the slot holder if it has a screw hole. Reconnect the monitor, keyboard, and mouse. Reboot the computer. If your monitor displays properly, the card is working. If you here some beeps and no display on screen (see also Beep Codes). Turn off the computer, unplug all connections. Unscrew and remove the video card again and put it back gently. Reboot the computer. If it is now working then proceed to windows. Insert the video card driver CD onto the CD/DVD Rom drive and follow onscreen instructions to install driver and additional software. If Windows doesn't prompt you, manually complete the installation using the Add New Hardware control panel. After the installation of video card driver is complete. Reboot the computer.

Wednesday, January 28, 2009

How to make a Network Cable


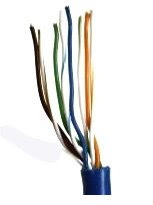
Ethernet Category 5 Cable The steps below are general Ethernet Category 5 (commonly known as Cat5) cable construction guidelines. In this example, we will be making a Category 5 cable, but the same general method will work for making any category of network cables.

Step1:
Unroll the required length of network cable and add a little extra, just in case. If a boot is to be fitted, do so before stripping away the sleeve and ensure the boot faces the correct way.
Ethernet Category 5 CableStep 2:
Carefully remove the outer jacket of the cable, exposing about 1 1/5 inch of the twisted pairs. Be careful when stripping the jacket as to not nick or cut the internal wiring. After removing the outer case, you will notice 8 wires twisted in 4 pairs. Each pair will have one wire of a certain color and another wire that is white with a colored stripe matching its partner (this wire is called a tracer). Sometimes a rip cord (white thread) is also present.
Ethernet Category 5 CableStep 3:
Untwist the pairs so they will lay flat between your fingers. The white piece of thread can be cut off even with the jacket and disposed. For easier handling, cut the wires so that they are 3/4" (19 mm) long from the base of the jacket.
Ethernet Category 5 CableStep 4:
Arrange the wires based on the wiring specifications you are following. There are two methods set by the TIA 568A and 568B. Which one you use will depend on what is being connected. A straight-through cable is used to connect two different-layer devices (e.g. a hub and a PC). Two like devices normally require a cross-over cable. The difference between the two is that a straight-through cable has both ends wired identically, while a cross-over cable has one end wired 568A and the other end wired 568B. For our demonstration in the following steps, we will use 568B, but the instructions can easily be adapted to 568A.

568B - Put the wires in the following order, from left to right:
White orange/ orange/ white green/ blue/ white blue/ green/ white brown/ brown

568A - Put the wires in the following order, from left to right:
White green/ green/ white orange/ blue/ white blue/ orange/ white brown/ brown

Step 5:
Press all the wires flat and parallel between your thumb and forefinger. Verify the colors have remained in the correct order. Cut the top of the wires even with one another so that they are 1/2" (12.5 mm) long from the base of the jacket, as the jacket needs to go into the 8P8C connector by about 1/8", meaning that you only have a 1/2" of room for the individual cables. Leaving more than 1/2" untwisted can jeopardize connectivity and quality. Ensure that the cut leaves the wires even and clean; failure to do so may cause the wire not to make contact inside the jack and could lead to wrongly guided cores inside the plug.
RJ-45Step 6:
Keep the wires flat and in order as you push them into the RJ-45 plug with the flat surface of the plug on top. The white/orange wire should be on the left if you're looking down at the jack. You can tell if all the wires made it into the jack and maintain their positions by looking head-on at the plug. You should be able to see a wire located in each hole, as seen at the bottom right. You may have to use a little effort to push the pairs firmly into the plug. The cabling jacket should also enter the rear of the jack about 1/4" (6 mm) to help secure the cable once the plug is crimped. You may need to stretch the sleeve to the proper length. Verify that the sequence is still correct before crimping.

Step 7:
Place the wired plug into the crimping tool. Give the handle a firm squeeze. You should hear a ratcheting noise as you continue. Once you have completed the crimp, the handle will reset to the open position. To ensure all pins are set, some prefer to double-crimp by repeating this step.
Crimping ToolStep 8:
Repeat all of the above steps with the other end of the cable. The way you wire the other end (568A or 568B) will depend on whether you're making a straight-through, rollover, or cross-over cable. Test the cable to ensure that it will function in the field. In addition, with power-over-Ethernet (PoE) making its way into the market place, crossed wire pairs could lead to physical damage of computers or phone system equipment, making it even more crucial that the pairs are in the correct order. A simple cable tester can quickly verify that information for you. Should you not have a network cable tester on hand, simply test connectivity pin to pin.

See also Wiring Code for 10BaseT/ 100BaseT Cable

Saturday, January 24, 2009

Belkin 2-Port KVM Switch

Belkin 2-Port KVM Switch Belkin's two-port KVM switch is an affordable switching solution that saves workspace while giving you control of two PS/2 computers from one console. It frees up desktop space and draws power off the keyboard, eliminating the need for a power supply. The Belkin switch includes such features as mouse and keyboard emulation to ensure smooth boot-up and operation, as well as hot-key functionality so you can switch ports easily through simple keyboard commands.
The unit supports high-quality video resolution of up to 1,920 x 1,440 (at 65 Hz through a 200 MHz video bandwidth) when used with the included coaxial VGA cabling. Its auto-scanning functionality, LED indicators, and PC99 color connectors make operation and organization easy.

Product Features:
1. Includes two six-foot Omni View KVM cable kits
2. Supports video resolution of up to 1,920 x 1,440 at 65 Hz
3. Supports multiple operating systems
4. Comes with a Belkin three-year warranty and free technical support
5. Features hot-key switching
6. Includes automatic scanning function
7. Offers keyboard and mouse emulation
8. Requires no power supply