Showing posts with label Software Tips. Show all posts

Wednesday, January 19, 2011

How To Fix Problems in PC crashes

Here are some useful tips on How to fix common problems in PC.How To Fix Problems in PC crashes
Your computer slows down, and part of the screen goes either black or white. This usually means that you’re using too many applications or programs all at once, and your computer can’t handle it. Try pressing ctrl+alt+delete, and look for the program that giving you trouble (usually labeled “not responding”), then try closing the said application by clicking end task. And if your computer is still in the line age of the dinosaur, try not to do all things at once. You might end up with less than you want to gain. Also, this may mean that your 20 years old version computer needs some upgrading like increase of RAM, or better yet, a new computer.

You removed some files or programs from your PC, and the next time you boot up, it won’t.
All computer operating systems (OS) have their own standard files and applications that will render the computer inoperable if you remove them. It safe to say that in windows, whatever was installed in your PC should not be removed, because windows will look for it when you boot up again. Also don’t simply delete programs that look unnecessary or uninstall them. When you boot up, windows system files look for programs that have been installed, so whether you remove the program manually or accidentally, you’re bound to get in trouble.

You installed a new hardware and software, and get a fatal exception error (or something like that). That’s what you called “Blue Screen of Death”. You might have installed something that is incompatible with your OS, it might be a new sound card, RAM, device driver, software. Try to remove that hardware that you installed or download the latest software updates for that particular hardware. Also pieces of advice, if you are unsure about installing something, try to find someone who knows better.

Why doesn’t my PC shut down, why is it so slow? When about to shut down your PC, allow a few minutes for some rest time. Illegal shutdowns can result in more permanent damage to your files or worst to your PC as well. The system might still be resolving something, maybe like cleaning up temporary files or folders, reallocating memory. This will help prevent from crashes. Try to backup your files on another media, like CD, DVD, or another hard disk. When your system fails, you can still restore your files.
Tuesday, February 09, 2010

How to Turn Off System Restore

System Restore is a component of Windows XP Professional that you can use to restore your computer to a previous state, if a problem occurs, without losing your personal data files (such as Microsoft Word documents, browsing history, drawings, favorites, or e-mail). System Restore monitors changes to the system and some application files, and it automatically creates easily identified restore points. These restore points allow you to revert the system to a previous time. They are created daily and at the time of significant system events (such as when an application or driver is installed). You can also create and name your own restore points at any time.

System Restore performs the following tasks:

1. Restores your computer to a previous state: System Restore automatically tracks changes to your computer at all times and at specific intervals by creating restore points before changes occur. Restore points are stored states of your computer. This allows you to restore the computer to a previous state, by choosing a restore point on a date or time prior to when you made the change.
2. Restores your computer without losing your personal files: System Restore does not cause you to lose your personal files or password. Items like documents, e-mail messages, browsing history, and the last specified password are saved when you revert to an earlier state with System Restore. System Restore protects your personal files by not restoring any files in the My Documents folder.
3. Stores one to three weeks of past restore points: The actual number of saved restore points depends on how much activity there has been on your computer, the size of your hard disk (or the partition that contains your Windows XP Professional folder), and how much disk space has been allocated on your computer to store System Restore information.
4. Locates dates associated with restore points: When you run System Restore, a calendar is displayed to help you find dates associated with restore points. If you don't use your computer every day, some days might not have any restore points. If you use your computer frequently, you might have restore points almost every day, and some days might have several restore points.
5. Ensures that all restorations are reversible: If you do not like the state of your computer after your restore it, you can undo the restoration or select another restore point. All successful restorations are reversible. All failed restorations are automatically reversed by System Restore.
6. Provides several types of restore points: The list below describes each type of restore point and how System Restore works with each type.
• Initial System checkpoints
• System checkpoints
• Program name installation restore points
• Windows XP Professional automatic update restore points
• Manually created restore points
• Restore operation restore points
• Unsigned device driver restore points
• Microsoft Backup utility recovery restore points

To turn off System Restore:
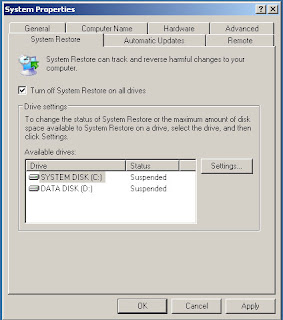
1. To open System Properties, click Start, click Control Panel, and then double-click System. In the System Properties dialog box, click the System Restore tab.
2. Ensure that the Turn off System Restore on all drives check box is selected. Then click Apply and Ok.
How to Turn Off System Restore
Note:
If you cannot turn System Restore off, your domain administrator might have enforced administrative system Group Policy on System Restore. Contact your domain administrator.

How to Speed Up Your Computer without Using Third-Party Software

speed up computerSo, you got yourself a new computer, but its not shaping up to what it used to be all that time ago? Here’s how you can help speed up your computer to like it used to be. All changes you make is at your own risk, no responsibility is taken if your computer stops working

Step 1: Opening the system configuration
This tool allows you to edit your windows start-up configuration changing what will run and what will not. Open the utility by going to Start, and then Run. Afterwards, type in “msconfig” and press OK. In Windows Vista, you may have to type ‘run’ into the search box on Start. Users with Windows 2000 do not have this utility, but they can still use it by copying the file from Windows XP or Vista and putting it onto your system. Operating systems below 2000 can not run this utility.

Step 2: Editing the startup settings
By clicking the ‘Startup’ tab, you can now choose what processes you would like to run on your computer at start-up. The more you uncheck, the faster your computer will be. Obviously, do not uncheck any Microsoft or Windows Operating System processes, as these will stop your computer from working. Make sure you leave checked any processes required for sound, video, display and virus protection software. It is inadvisable that you change any other setting, but once finished, restart your computer.

Step 3: Uninstalling unnecessary programs
After time you may have got yourself programs you don’t even need anymore. You can easily uninstall these programs from your Control Panel. Going to your Control Panel and selecting ‘Add or Remove Programs’, or for Vista users ‘Programs and Features’, will bring up the necessary screen. Browse through the list of programs you have, and choose the uninstall tab on the program you wish to remove, highlighting first the program you want to remove. Once the setup is done, continue uninstalling programs until you are happy, it also will free up extra space on your hard drive. Restart the computer once finished. Do not uninstall any programs that have been installed by Windows Update / Microsoft Update, these are necessary to keep the computer working properly. Also, do not uninstall Java.

Step 4: Running a disk defragmenter
Defragmenting your hard disk helps to speed up your computer and its ability to load files faster. To run this, go to Start, then All Programs, then Accessories, then System Tools, and finally choose Disk Defragmenter. It may take several hours to complete, but it can be worth the time after.

Step 5: Adjusting your computer for best performance
If you like the style of the old Windows Classic themes, you should follow this step to enable your computer to be faster. Sure it’ll look a bit uglier on the eyes, but at least you’ll be ahead of the game. Going to Control Panel, then System (then Advanced System settings for Vista), will bring up your computer’s system information. Click the advanced tab, if not already, and press the ‘Settings’ button underneath performance. Select the option to “Adjust for best performance” and press apply.

Step 6: Increasing the virtual memory
Virtual memory, also known as Page File memory, uses a portion of your hard disk and acts like RAM allowing more information to be used and made at one time. It stores data about programs while your computer is running, and dumps it as needs be. Keeping the performance window open, go to the Advanced tab. By clicking the ‘Change’ button will allow you to increase your virtual memory. Uncheck the setting “Automatically manage page filing size for all drives”. Then choose your hard disk drive from the list and choose custom size. Set the sizes accordingly to however much page file your computer uses (1024MB is best as an initial size). Once finished, press ‘Set’ and ‘OK’. You should not set your maximum size larger than double the minimum setting, otherwise too much space may be used on your hard drive leaving you nothing left.

Step 7: Running a virus scan
If you have an anti-virus scanner installer on your computer, have a disk with one on handy, or a place to get a free scanner (Such as Avast or AVG free), run a thorough virus scan on your computer, it will help to detect any harmful computer viruses and remove or contain them in a secure way. Viruses will slow down you computer, so it is handy to have.

Wednesday, October 14, 2009

Change the Screen Resolution of your Monitor

Change the Screen Resolution of your Monitor
The setting that determines the amount of information that appears on your screen, measured in pixels. Low resolution, such as 640 x 480, makes items on the screen appear large, although the screen area is small. You can switch your screen resolution temporarily to 640 X 480 if you have games or other programs that are set to run at that resolution. High resolution, such as 1024 x 768, makes the overall screen area large, although individual items appear small. Your monitor and video adapter determine how much you can change your screen resolution. You may not be able to increase the resolution above a certain level.


To change your screen resolution
1. Open Display in Control Panel.
2. On the Settings tab, under Screen resolution, drag the slider, and then click Apply.
3. When prompted to apply the settings, click OK. Your screen will turn black for a moment.
4. Once your screen resolution changes, you have 15 seconds to confirm the change. Click Yes to confirm the change; click No or do nothing to revert to your previous setting.

To change screen resolution in desktop
1. Right-click on desktop (Make sure you don’t hit the icons). Then click Properties.
2. On display property, click settings tab, under Screen resolution, drag the slider, and then click Apply.
3. When prompted to apply the settings, click OK. Your screen will turn black for a moment.
4. Once your screen resolution changes, you have 15 seconds to confirm the change. Click Yes to confirm the change; click No or do nothing to revert to your previous setting.

Sunday, June 07, 2009

The Different Internal DOS Command

If you are a DOS (Disk Operating System) novice just learning these commands I would recommend just scrolling down the screen and reading about them all. Just remember the important ones like: DIR, COPY, CD, RD and DEL. In programs that respond to commands through a command-line interface, the user must enter an exact command, usually in the form of a keyword, into the computer. They will get you started. Internal DOS commands are a part of the operating system and are loaded together with it. Running internal DOS commands doesn't require the presence of a system disk in a drive.

BREAK - Sets or clears extended CTRL+C checking.
CD - Displays the name of or changes the current directory.
CHDIR - Displays the name of or changes the current directory.
CLS - Clears the screen.
CMD - Starts a new instance of the Windows command interpreter.
COPY - Copies one or more files to another location.
DATE - Displays or sets the date.
DEL - Deletes one or more files.
DIR - Displays a list of files and subdirectories in a directory.
ERASE - Deletes one or more files.
EXIT - Quits the CMD.EXE program (command interpreter).
MD - Creates a directory.
MKDIR - Creates a directory.
PATH - Displays or sets a search path for executable files.
PROMPT - Changes the Windows command prompt.
RD - Removes a directory.
REN - Renames a file or files.
RENAME - Renames a file or files.
RMDIR - Removes a directory.
SET - Displays, sets, or removes Windows environment variables.
TIME - Displays or sets the system time.
TYPE - Displays the contents of a text file.
VER - Displays the Windows version.
VERIFY - Tells Windows whether to verify that your files are written correctly to a disk.
VOL - Displays a disk volume label and serial number.
LOCK - It 'locks' a disk so DOS programs can have direct access to it.
UNLOCK - This unlocks a drive from direct disk access.

That’s it guys! I hope the following internal DOS commands were helpful to you. I know there are a lot of internal DOS commands available in DOS but those commands are the only thing I remembered just notify me if some are missing in you’re lists.

Wednesday, April 15, 2009

How to Run Disk Error Checking Utility

In addition to running Disk Cleanup to optimize the performance of your computer, you can check the integrity of the files stored on your hard disk by running the Error Checking utility. As you use your hard drive, it can develop bad sectors. Bad sectors slow down hard disk performance and sometimes make data writing (such as file saving) difficult, or even impossible. The Error Checking utility scans the hard drive for bad sectors, and scans for file system errors to see whether certain files or folders are misplaced.
If you use your computer daily, you should run this utility once a week to help prevent data loss.
To run the Error Checking utility:
  1. Close all open files.
  2. Click Start, and then click My Computer.
  3. In the My Computer window, right-click the hard disk you want to search for bad sectors, and then click Properties.
  4. In the Properties dialog box, click the Tools tab.
  5. Click the Check Now button.
  6. In the Check Disk dialog box, select the Scan for and attempt recovery of bad sectors check box, and then click Start.
  7. If bad sectors are found, choose to fix them.

Tip: Only select the "Automatically fix file system errors" check box if you think that your disk contains bad sectors.

Related Topic: (How to used Scandisk)

Tuesday, April 14, 2009

How to use Disk Cleanup Utility

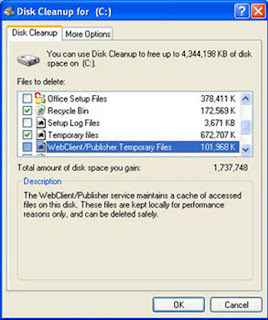
By freeing disk space, you can improve the performance of your computer. The Disk Cleanup tool helps you free up space on your hard disk. The utility identifies files that you can safely delete, and then enables you to choose whether you want to delete some or all of the identified files.

Use Disk Cleanup to:

  • Remove temporary Internet files.

  • Remove downloaded program files (such as Microsoft ActiveX controls and Java applets).
  • Empty the Recycle Bin.
  • Remove Windows temporary files.

  • Remove optional Windows components that you don't use.
  • Remove installed programs that you no longer use.

Tip: Typically, temporary Internet files take the most amount of space because the browser caches each page you visit for faster access later.
To use Disk Cleanup:

  1. Click Start, point to All Programs, point to Accessories, point to System Tools, and then click Disk Cleanup. If several drives are available, you might be prompted to specify which drive you want to clean.
  2. In the Disk Cleanup for dialog box, scroll through the content of the Files to delete list.


  3. Clear the check boxes for files that you don't want to delete, and then click OK.
  4. When prompted to confirm that you want to delete the specified files, click Yes.

After a few minutes, the process completes and the Disk Cleanup dialog box closes, leaving your computer cleaner and performing better.

By: Techlabcapiz

Sunday, December 28, 2008

How to make your Computer Healthy

Tips for a healthy PC

1. Don’t manually delete.
Don’t delete an application from your hard drive unless you have to do. Doing so will leave you with visible and invisible debris cluttering up the hard drive.
2. Don’t open everything at once.
Unless you have a top-of-the-range system, avoid firing up multiple programs all at once. Windows has been known to freeze up on slower systems it its given too much to do at once.
3. Run Scandisk.
Try and run it at least once a month to check file and hard drive integrity.
4. Watch Out.
Check the integrity of all files loaded to your PC. If you often download files from the net, it is particularly essential that you install a virus detector. But remember, even files given to you by a colleague on USB flash drive can infect your system.
5. Backup your files.
Windows have their own backup utilities, accessed through System tools.
6. Run the Disk Defragmenter.
Do this once a month too. Your hard drive can get fragmented if you are often installing and uninstalling programs.
7. Get acquainted with System Tools.
Windows in particular, has an impressive range. A few minutes a week turning your PC could save you trouble down the line.
8. Press Ctrl, Alt, Del.
If your system crashes or freezes, try not just switch off manually if possible. Try and get a response first using Ctrl, Alt, Del simultaneously: shutdown from there.
9. Backup before editing.
This can’t be emphasized enough: never try editing the OS Registry file before packing up the original configuration first.
10. Be aware.
Be aware of programs running in the background. If many are active, you should be aware of the possibility of a system lock-up, you can see what is running by opening the task manager by pressing Ctrl, Alt, Del simultaneously.

How to avoid the Blue Screen of Death

Blue Screen of Death Here are some excellent tips sent in by a community member at large, to help us all avoid the Blue Screen of Death. These are not only frustrating, they can also sometimes signal a major failure.

Here are some tips on how to avoiding Blue Screen of Death problems
1. Reboot daily. Windows stores some vital information in sections of RAM called resources. If these resources become full then Windows can become unstable. To avoid this, don't run too many programs at once and reboot your computer every day.
2. Video drivers: The code controlling your display can cause problems. If you get errors that refer to a file that ends in .VSD then check the graphics board vendor's Web site for a more up-to-date driver.
3. Viruses: If you don’t know how to remove viruses and other variants, these can cause all sorts of unpleasant problems so please make sure you are using an up to date antivirus tool. It's no good unless you update it regularly. Try downloading some Anti-Virus like F-Secure, It has all the features you'd expect. It's comprehensive, has regular downloadable updates, and is absolutely free for home and small office users. It also regularly wins awards for killing lots of viruses and other variants!
4. Incompatible system files: When you install Windows software, the installation routine can replace existing Windows .dll files. There's often a dialogue box that warns if the installer has found a later version of a file on your hard disk than the one it is installing. If you accidentally installed the earlier version then programs expecting the more up to date .dlls can get confused and cause problems. The answer is to reinstall the original program once again to restore the correct files. Indeed a general tip is to reinstall any programs that cause problems.
5. Check for updates: Sometimes programs have known problems - known to the vendor that is! Check the vendor's web site for information about how to avoid clashes. There may be patches or updates to download.
6. Hardware problems: Sometimes hardware problems can cause crashes. Bad memory, unstable power supplies, processors running too hot, cables with poor connections or boards that are not properly seated can all cause problems. Check that the fan is running properly - you should be able to hear it. Also check that the ventilation apertures are not blocked with dust.
7. My last Tip: Don’t try to read the Blue Screen of Death. Reading the Blue Screen of Death will just cause you confusing and make yourself look like a fool. It will only help to write down the STOP number near the bottom of the screen and search it by using Google to help you solve the situation. This is yet another way to help you solve the issue if everything else fails. If nothing else works then is probably time to reinstall Windows. If you don’t know how, then contact a computer technician nearest you. This is easier than it sounds and you'll be rewarded with a frisky, responsive system that should run smoothly -at least for a while!

Monday, December 01, 2008

How to Remove ImgKulot and Other variants

Maybe you experienced that when you open your hard drive or USB flash drive an error message appear something like this:
Windows - No Disk Exception Processing Message c0000013 Parameters 75b6bf9c 4 75b6bf9c 75b6bf9c
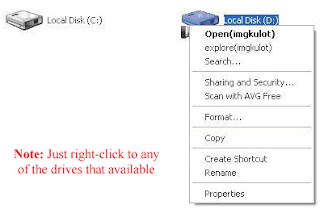
Don’t worry you’re not the only one who experienced something like this, me too. This is script worm that affects only Windows operating systems. It spreads itself on removable storage devices such as diskettes, USB flash drives, memory cards of cell phones, digital camera, Mp3/Mp4 players and the like and installs itself on the Registry, thus affecting the system and it will continually display an error. Probably some of you already have encountered this annoying virus named imgkulot that prevents you from opening your removable drives. Imgkulot is simply annoying which copies itself to any storage devices available in your computer. So if you notice that when you right click on your hard drive…you will see a similar letter with a word like this or similar to these: (see image)
Follow this picture


Another characteristic of this script is when you open a folder, usually folders are opened on the same window…but once your computer is infected, the moment you open a window it to open to a new window…also, you cannot open your hard drive unless you right click it and choose open, explore or you go the address bar of windows explorer and type the drive directory of your hard drive…this script doesn’t harm your computer but it will just irritate you because it affect and modify your registry settings of your windows.

Take note of this. Imgkulot copies and hides the following files:

1. Autorun.inf - this is not a virus in itself. Generally it’s an instruction file which, from the name itself, runs automatically when a drive is opened. However, this is the part that launches the actual virus.
2. Imgkulot.vbs - a Visual Basic Script which is the actual malware (malicious software) virus.
3. Imgkulot.reg - a part of the malware which is saved in the windows registry.

Double clicking on the infected drive(s), like we usually do, would launch the virus and when you insert another removable drive (flash disk or even the memory card(s) of your cell phones and digital cameras), the virus would copy the files listed above to the uninfected drive. Right Clicking the drive and clicking Open would do the same.

Using Anti-Virus Programs
There several anti-virus programs in the market that offers to remove all or disinfects a virus, but sad to say lads, not all of them works. If you’re using AVG for example, AVG leaves the imgkulot.reg and the Autorun.inf on the drives. As a result when you double click the infected drive, you'll get an error message that says, "Imgkulot.vbs not found", (or something similar) and makes your drive inaccessible still.

Removing this annoying imgkulot virus

If your anti-virus does not works you can still try download some virus removal tool that several anti-virus vendors offer, but as I said it will not really guarantee you that it will remove all of it. But there’s no harm in trying.
Now before you call your computer technician to deal with this problem, you read on and you will be able to solve this problem all by yourself. And even if you call a technician and if he/she says you need to reformat your drive, (believe me I have encountered some technicians who would readily reformat a harddrive or a flash disk for a simple problem like this, throw them out of your door and tell him to never come back as soon as they say the word REFORMAT!

You can remove it manually by removing its entries in all your drives (including flash drives and memory cards) and in the registry. We can remove the imgkulot.reg from the registry and kill the wscript.exe from the process manually. How to do this? Very simple Lads. Here's what I did.

IMPORTANT: Please turn-off system restore to all of your drives.
Another thing before you performs the actual killing process restart your computer and run safe mode first. To execute safe mode you should press F8 several times to be sure before windows launches. Select safe mode and press enter key.

A. To start the killing process.
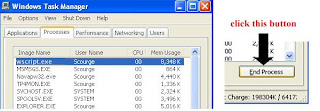
1. Bring up the Task Manager by pressing Control-Alt-Delete (Ctr-Alt-Del)
2. Click on the Processes tab.
3. Look for Wscript.exe from the list and select it.
4. Press End Process. (See image below)
This will prevent the virus from writing itself on the drive again after you delete it (next steps)
Open Task Manager
If you could not bring up the task bar and you get a “Task Manager has been disabled by your Administrator” message, you probably have another virus in your system that prevents this.

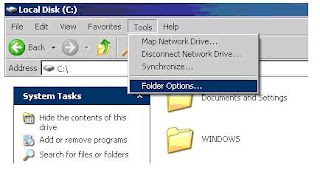
B. Go to My computer.
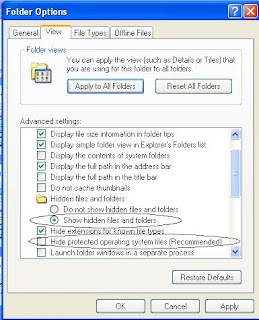
From the main menu select Folder Options.

Open Folder Options
- Then Click the View Tab.
- Then Select Show hidden files and folders
- Then uncheck Hide protected operating system files

Open View Options
C. WARNING! Please pay attention to this, DO NOT DELETE OTHER FILES aside from the ones listed below.
D. Open Drive C:/ look for all the names listed below
Then delete the Autorun.inf and the three files with imgkulot names.
-imgkulot.vbs
-imgkulot.bat
-imgkulot.reg
other known variants:
bungoton.vbs bbgong.vbs
bunguton.bat bbgong.bat
bunguton.reg bbgong.reg
kulitot.vbs burangos.vbs
kulitot.bat burangos.bat
Kulitot.reg burangos.reg

E. After you delete the four mentioned files on Drive C: go to Windows Folder and search the entire directory again and delete all the mentioned files above that appear on the directory.
F. Next go to System32 folder and apply step E
E. And lastly, if your hard disks have several partitions, apply it also to the other drives as well.

The article that I wrote is based on my personal experience and from what I've read from other sources of file(s) and or information. The procedure that I’ve given is worked for me and other computers that I repaired that have been infected by this virus. I could not give a 100% guarantee if the process that I given will work for you especially if you have other viruses in your PCs. So be careful with what you plug in to your computer, scan it first...alright! But still, Hope you can make it.

If you have any problem just post a comment below…good luck

Sunday, November 23, 2008

Freeze PCs

Common problems in PC, crashes, and safety precaution

Most of us computer users have experienced at one time or another that your computer sudden urge to freeze up and crash. Most of you might blame it on windows and most probably Bill Gates, but there are other reasons or causes why a certain program of yours suddenly won’t respond, or why your computer suddenly won’t boot up. I know you might experience some of this, but never fear lads, you are not alone in this kind of crusade. We are legion. Even MAC or Linux users get the blues.
Now let see if you’ve had any of these nerve-wracking and head banging events happening to your computer just trying to beat a deadline…
Your computer slows down, and part of the screen goes either black or white. This usually means that you’re using too many applications or programs all at once, and your computer can’t handle it. Try pressing ctrl+alt+delete, and look for the program that giving you trouble (usually labeled “not responding”), then try closing the said application by clicking end task. And if your computer is still in the line age of the dinosaur, try not to do all things at once. You might end up with less than you want to gain. Also, this may mean that your 20 years old version computer needs some upgrading like increase of RAM, or better yet, a new computer.
You removed some files or programs from your PC, and the next time you boot up, it won’t.
All computer operating systems (OS) have their own standard files and applications that will render the computer inoperable if you remove them. It safe to say that in windows, whatever was installed in your PC should not be removed, because windows will look for it when you boot up again. Also don’t simply delete programs that look unnecessary or uninstall them. When you boot up, windows system files look for programs that have been installed, so whether you remove the program manually or accidentally, you’re bound to get in trouble.
You installed a new hardware and software, and get a fatal exception error (or something like that). That’s what you called “Blue Screen of Death”.
You might have installed something that is incompatible with your OS, it might be a new sound card, RAM, device driver, software. Try to remove that hardware that you installed or download the latest software updates for that particular hardware. Also pieces of advice, if you are unsure about installing something, try to find someone who knows better.
Why doesn’t my PC shut down, why is it so slow? When about to shut down your PC, allow a few minutes for some rest time. Illegal shutdowns can result in more permanent damage to your files or worst to your PC as well. The system might still be resolving something, maybe like cleaning up temporary files or folders, reallocating memory. This will help prevent from crashes. Try to backup your files on another media, like CD, DVD, or another hard disk. When your system fails, you can still restore your files. Screensavers and desktop themes along with a huge desktop picture of you and your boyfriend/girlfriend can also eat up resources, so try to disable those, or get one that’s not too heavy. Regular system maintenance can prevent slowing down or crashes of your PC. Try to run disk defragmenting and scan disk sessions, virus scanning, dust cleaning, and cleaning up unwanted files. That’s all folks thanks for reading.

Tuesday, November 18, 2008

Repair Your Own PC when Disaster Comes

What do you do when your expensive computer suddenly seems possessed? Whether it’s satanic software or a hard drive from hell, there are hundreds of vexing problems that can make it devilishly difficult to get anything done. Don’t call for an exorcist just yet guys. I’ll show you how to solve your computer that without explanation suddenly possessed, sickening slowdowns, and even revive a dead hard drive by popping it into a freezer. With a pinch of luck and a bit of skills. You can send those digital demons back to the abyss.

Possessed PC
Trouble:
Your PC has a will of its own: The cursor grows and shrinks; letters appear and disappear; and graphics look psychedelic.

Fix: When I see strange screen behavior, I immediately suspect the driver (a small program that works with Windows to control hardware) for my graphics card.
To isolate or eliminate your graphics driver as the culprit (my pal Steve will be happy to know that I'm about to give another software fix), install the Windows VGA graphics driver. Right-click the desktop and choose Properties, Settings, Advanced, Adapter.
If that cures the on-screen ills, download the latest version of your graphics card's driver from the vendor's Web site. If you can't find it, call the company's technical support staff.

Folder Freak-Out
Trouble: Some files and folders look like they've been translated into a Russian or any languages that unknown to you. Worse, one folder seems to have disappeared.

Fix: These trouble signs make my blood run cold, because they're indications of a dying hard disk. First, rescue critical data that hasn't been backed up by copying everything to another hard disk, a CD-RW disc, a Zip disk, or some other storage medium.
Then I recommend that you run the Windows Scandisk utility. Double-click My computer icon select Drive: C or D whatever drive you want to check. Right-click on the drive icon, select properties go to tool tab, look for Error checking label and finally click the “Check Now button”. By clicking the start button it will checks the hard disk for physical damage.
The hard disk may be approaching the end of its life and may need to be replaced.
If you can't back up your files--and it looks like more files are disappearing--you'll need to turn off the computer, remove the hard drive, and take it to data recovery service software if you have. If you don’t have a data recovery tool you can download it into the net.

Running on Empty Memory
Trouble: All of a sudden your system is running unusually slowly (oh! I hate that), crashing, and issuing Low Memory errors.

Fix: My first thought was: Invest in a new CPU and/or RAM upgrade. But don’t buy a new memory yet the idea of opening up a PC when there may be a less drastic way to fix things. For this problem, I agree. Windows XP users should have at least 128 MB of memory. If you run multiple applications at once, anything less than 128 MB will feel like computing in quicksand. If you already have plenty of RAM, then you have two other options: Beef up your PC's virtual memory and look for a memory leak. Virtual memory is a special file on the hard disk--often called a swap file--where the PC stores overflowing data that won't fit in RAM. Windows adjusts the size of the swap file as memory needs grow and shrink. But if the hard disk starts to run out of free space, the swap file may not be able to grow to the size it needs, and the machine will run sluggishly as a result. Either delete or remove files to make room on the hard drive. Or move the swap file to a partition or an additional hard disk that has available space. For Windows XP users, select Advanced, Performance Options, Settings. Then select “Let windows choose what’s best for my computer. The other option is to check for a memory leak. Sometimes software--because it's damaged or poorly designed--won't let go of its assigned memory when it's done using it. If you keep opening and closing the application, it gobbles up more memory until the system has no available RAM. Rebooting the machine can temporarily fix the problem by resetting your memory to its normal settings.

Water Rescue
Trouble:
There’s a typhoon and your computer caught in the flood and sinking like a sub underwater. It’s time to kiss your hardware goodbye. Or is it?

Fix: For desktop PCs caught in the flood, being plugged in and even with no more power-is enough to fry the motherboard the good news is many floods are accompanied by power outages that could spare your system. Open the device and expose the interior, remove the peripherals and gently shake out the water. Use a soft rag to clean off dirt or mud. Use distilled water—a gallon or more for PC, to thoroughly rinse components, particularly metallic leads and wired connectors. Distilled waters clean salts and minerals that slow down good connections. Use soft cloth to wipe the device dry and set it out for 24 hours in a dry, warm place. Apply electrical contact cleaner solution to clean the device and reconnect them. Replace power supply if it got soak and install a new CMOS battery. Also plan to replace spinning media drives if they got wet, they’ll probably fail soon.

Pesky Virus Attack
Trouble: Your PC might have a virus--and you're not running an antivirus utility.

Fix: Start panicking. (You'll do it even though there's no need yet; I always do the same.) Once you're calm and you have access to your browser and the Internet. Download a virus scanner utility. After downloading a copy of this small program onto your PC, anti-virus scans your computer's hard drive, finding and removing pesky viruses.
The best advice? Preventive maintenance "Keep Your PC Neat and Tidy" Always scan e-mail attachments and new downloads, back up your data at least weekly, and update your virus program often.

Get Files Back From the Dead
Trouble: You deleted a file and just realized that you need it for something.

Fix: Now you've done it. You were so sure you didn't want that file that you bypassed the Recycle Bin and permanently erased it by holding down the Shift key when you deleted it. Solution? Download a data recovery programs, it bring deleted files back from the dead--even if you've already formatted your drive.

Hard disk CPR
Trouble:
Your expensive drive died and went to heaven. How in the world can you retrieve your files?

Fix: You can download a Data recovery software on the internet to retrieve you files. It will just cost you some bucks. Though pricey but it’s effective. Another trick for copying data from a drive that won’t spin or read. Place in a Ziploc freezer bag and pop it into the freezer for an hour. Yah! Seriously. Cooling the disk can change the geometry of the head and platters. Use another hard disk and mirroring software like virtual ghost ready to make one shot transfer of your data contents. Still no luck? Here’s your final solution. Use a torx driver ( a screwdriver with a star shaped head) and remove the cover of your hard drive and then give the drive heads a nice gentle tap. Hook the drive to your system (of course with top off) and see if you can access the disk.